| Kawasaki KRT Kit ECU - Fuel Injection Tuning - Marc
Salvisberg |
| Rough draft - |
| |
OK - this is the first start of the 05/06 zx6r tuning project that
we did.
We'd done quite a few 03 and 04 600's a 636's, including a magazine
project bike for Ed Sorbo at Roadracing World - but this was the
first Kaw we'd done in a while and the first 05 / 06 that we'd started to do.
The KRT kit FI Tuning manual is OK, and the software was improved from
03/04 but there was a small problem - Installing the kit ECU adapter
harness on an 06 636... Seems the pdf manual has an ambiguous description of
where the 2 wires that you need to insert into the bike's ecu
actually connect. It shows a picture of something that doesn't quite look
like a stock Kaw connector and wires....
Thanks Phil Seton (Seton
Tuning UK site) and Shannon Woods at Attack Racing for helping and
attempting to help sort the wire issue out.... |
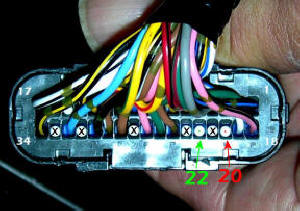 |
These
2 gray text boxes only for 05-06 zx6rr 600 and zx6r 636's.
If you have a kit harness or a ZX10, skip this box - If you are using a
zx6r kit
ecu with a stock wire harness and the Kawasaki kit harness adapter -
LOOK!
This is the larger of the two stock wire harness connectors
that plug into the ECU.
The 2 wires on the kit wire harness adapter (the $30 part you had
to buy so you could use your stock wire harness), plug into
locations 20 and
22.
The red wire to
pin location 20
The
white w/ green tracer to pin
22
#''s 20, 21, 22 and 23 are blanked with white pins in the stock
harness from the factory. The wire location numbers are small and
are 1 and 17 across the top and 34 and 18 across the bottom of the
flat back connector plate in this picture. |
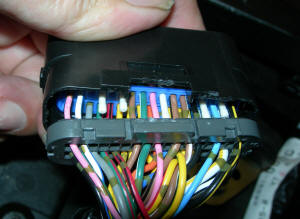 |
Unclip the back flat connector housing, lift it up, remove #20
and #22 white plastic blanking pins. Replace the flat back and insert the 2
adapter harness wire into their proper holes. Look at the manual!
The small metal terminal must be oriented correctly, in reference to
the black plastic connector housing or it will not insert
properly (fully). With the connector oriented with the latch UP,
the metal terminal must be oriented with the backbone of the
terminal closest to the connector latch mechanism. I.E, the female
pin receptacle "tube" of the terminal would be on the bottom of the
terminal when oriented properly.
This picture shows the black plastic connector housing with the
latch mechanism oriented UP. |
| KRT Software |
| |
Kawasaki kit KRT Computer Software
The Kaw kit Tuning Software uses a "one time purchase" ECU to
PC/Laptop Interface Cord, pn:26031-0240. It's not just a cable, it's
a translator box / adapter wire harness to allow communication between your
computer and the kit ecu.
It's a serial cable device and seems to work well and reliably as long as
you have the previously mentioned wires connected (or it will give
you "Can't communicate" or "can't find" ecu error messages when you
test the comm.) |
| |
Software install:
Install the software: I suggest using the default C:\Program
Files\RACE.
If you are "reloading" the software for some reason, make sure you
delete or rename the directory RACE before you try to reinstall or the
program's status bar will go about 1/4 way, wait a second and then
disappear - with no error message.
If you are planning on deleting the RACE directory and restarting
the install - make SURE you
save any lower level WORK files that you may have done and want to
save before you delete RACE. |
| |
Opening the program:
Pretty sparse landscape!
- You'll have to first "pick" your
machine. That sets up the program with your bike's parameters and
some other things.
Main menu: click on Set, Machineselect.
- If all went well in the install, you'll see a list of bikes. The 05
zx6rr(ZX600N) is used for the 05-06 zx6rr's and the 05-06 zx6r 636.
You have to pick the correct machine,
and then close and restart the program. (that
is a rather interesting procedure...)
|
| |
Next, you need to "Open" a calibration file.
It's a group of maps that offset the fuel, ignition, etc. values
from the permanently programmed internal kit ECU maps.
- Main menu: click on "File/Open"
- If all
default paths were accepted during install, you be able to choose a
map that is in the WORK subdirectory of the selected machine's
subdirectory (machineselect).
|
| |
At first, you'll only get a
choice of "standard_data.est" or similar.
- This is the
beginning table. It consists of a group of "zero" maps for the
permanent ROM based ECU tables that Denso flashed into the ECU.
- You could download the
"standard_data.est" into the ECU and
the bike would run the same as before.
- Choose the "standard_data.est" file.
- You will now be able to choose
a single table in the next box. Pick any one of them for now or hit
"cancel". Once you have gotten to this box, either way, you can
check the PC to ECU communication.
|
 |
- Main menu: click on "Set/Monitor". That's so you can see the throttle position
and RPM, etc. while the engine is running. Turn on bike's ignition
and kill switch to "Run" and "start" Monitor.
- If you get some numeric values of temperatures and pressures. Great. That means your
com Port
is set correctly.
- If "Failed open RS232C port", then close Monitor and
go to Main menu: Set/RS232 and try
another serial port that you actually have, till you've tried all 8.
- If you
are using a real 9 pin serial port, they are usually 1 through 4.
- If you
are attempting to use a USB to Serial converter, it's usually going to be ports
5 though 8.
- You could have cheated and looked
a your computer hardware and seen what open com ports your computer
has......
- If you choose the right port, the cable is connected properly, the
bike's power is on and the kill switch is in "Run" position, you
should have the Monitor showing current data about the bike. You can
start the bike and watch the values change.
- Monitor doesn't have the world's quickest refresh rate, but unlike some
aftermarket tuning "schemes",
it seems to be very solid.
- Remember - the ECU has to run the bike
AND communicate to the outside world, reliably.
- Our Teka 4usb refresh rate, for instance, will visually trace on the
table, you "blipping" the throttle in neutral and that's quicker
than anything else I've seen - but Denso's Monitor is perfectly fine
for steady state testing.
- Bummer is if you
are using the correct com port and you get a "Can't find ECU" error
message.
Then it's:
Check bike's ignition switch = ON
Kill switch =
RUN
Wire harness adapter's 2 wires are inserted
in the large ECU connector and the connector
is plugged into the ECU.
Wire adapter is plugged into
"ECU to PC/Laptop Interface Cord" AND
the bike's stock wire harness.
ECU to PC/Laptop Interface Cord is
plugged
into your serial port.That's all I can think of at the moment. Hopefully that's all you
need.
I happen to use a laptop to do KRT tuning. Older laptops tend to have
a serial port and newer laptops tend to only have USB. I try to not
use USB to Serial converters for the initial bike/computer setup as
there are common special USB properties than can
prevent communication - even though all seems ok.
|
| |
So, assuming that you've got your Monitor running (all you
really need to view is Throttle % and RPM). You can go up to the
main menu and select the items that you want displayed in Monitor.
Limit it to RPM and THrottle %.
- Go up to main menu: Select File/Menu or hit the "F1" key.
- Up pops a box named "Menu dialog".
- On the right, select "Multi Map edit".
- Up pops another box that is mostly grayed out, "Multi Edit Mode" is
selected and (oddly) says "#1,#2,#3" and is (probably) supposed to say #4 if you have
the right Windows font. (and none of my computers do). It only temporarily links
the 2 fuel maps and nothing else.
- You can't really select anything different here.
- When you click
"OK", you are temporarily locking "Compensation Map for Injection
No.1" and "Compensation Map for Injection No. 2" together.
- Compensation inj table 1 is the fuel rate for cylinders 1&4 and Compensation inj
table 2 is cylinders 2&3.
- After you click OK, you'll see that your upper menu "Label" field
will say "#1,#2". That means Compensation inj table 1 and Compensation inj
table 2 are
locked together (and not just cylinders 1 and 2).
- Magic! Something familiar is on the screen.
- On the top, the "Map" there's actually a bunch of overlaid lines at "0"
(it looks like 1 line) and on the
bottom, there's a familiar fuel injection "offset TABLE". Looks
similar to a Teka 4usb or PC table.
- Technically, a graphic representation of a numeric "table" is a
"MAP" and a spreadsheet-like looking grid of numbers is a "TABLE".
Dynojet calls their Tables "maps", so, that might be confusing when
you work with a larger manufacturer's products.
Pretty much ignore the graphic
representation of the maps, it's pretty but not much useful......
Denso doesn't let you see the actual base fuel, ignition and other tables, they only let you
modify offsets (to their predefined limits). It's the same in the
Suzuki, Honda "kit" Denso ecu's. Note!
The Denso
software is set up to really NOT want you to accidentally leave the
2 Comp inj Maps linked. It will delink them whenever you change to
another type of map (like the Ignition table) or when you exit the program. So - if you want
them linked (and you usually do when doing initial tuning, check
that "LABEL" displays "#1,#2" exclusively in the dropdown listbox.
|
| |
RPM "Breakpoints", steps or increments
Look at the fuel map:
Now is the time to make sure that the rpm increments and
THrottle %
position increments are what you want. If you don't do this now, you
can't do it later without discarding all tuning work you've already
done. (you only make that mistake once....)
Double click on the rpm increment you want to change, and change it.
The
program will force you to do 14 increasing rpm value steps, from left to
right. On the 600's, you probably would use 2000 to
14500, and I think that the supplied "standard_data.est" for the 05 600 was 2000
to 16000.(skipping 3000) - but I'm pretty sure that they didn't give YOU
the ability to program a 16,000 rpm redline!
On the 05 zx6rr, you can only add (from my memory) 300 rpm to the original rev
limit, still less than 15,000 rpm.
With a stock rev limit, I'd use 2000 to 14,500 rpm
If you raise the rev limit, maybe you'll have to use 2000
to 15000 in 1000 rpm steps.
At any rate, 1000 rpm increments are alright for high rpm.
If the KRT software could do it, It would be possible to get very slightly
better power results, using 500 rpm increments, but - that small potential
improvement disappears if you are tuning "to an air fuel ratio", rather than
loading the engine and measuring power (meaning that dynojet dynos and the rest
of the "tune to an AFR clones can and usually throw away potential power)
Remember, these are the REAL rpms, not the bike's TACH rpm.
The stock tach is ~10% optimistic (as common with stock tachs).
A relatively stock zx6r/rr doesn't make power at a real 16000 rpm or is
mechanically, in the valve train area, strong enough, so it's not
recommended to raise the rev limit to 16000. In fact, in a stock
engine, DON'T DO IT and the KRT ECU that you buy won't let you do it, anyway
You cannot add, what is called "an extra rpm breakpoint" in FI
tuning language, you can only change the value of an existing
breakpoint. I think that there's 14 rpm breakpoints (from memory).
You can change the THrottle % breakpoints, too. I feel that 100, 80,
60, 50, 40, 30, 20, 15, 10, 7, 3, 0 are pretty comfortable and a
little better than the "standard_data.est" values. I'm doing this
from memory, so if you need another, I'd add 25% TH). Those are not
quite as fine an increment as the THrottle % breakpoints that are
used in our Teka 4usb module, but the 12 KRT THrottle breakpoints
are better than a power commander's PC3 and PC5 coarse THrottle breakpoints.
You might notice that I capitalized "TH" in "THrottle". That's
because eventually, I'll just type "TH" and you are supposed to know
that means "THrottle".
After you make the breakpoint values, Save
the map as "MySTD_data,2k16k,myTH.est" or something that makes sense
to you. It will, by default, save it in your selected "machineSelect"
bike's WORK folder. Now -
BEFORE you merrily go on to your base test with your "zero" "standard_data.est"
map, Send your "Mystandard_data.est" file to the ECU
with "Data Exchange" |
| |
Constants List
- This is a set of KRT tuning "constants" for the Denso KRT ECU.
- All Area Fuel Compensation Value
- This is the table that overall richens or leans out the fuel
tables - as a foundation for the other fuel tables.
- This is the table that you find that you need when you have done
about 75% of the mapping - Suggestion - do the main fuel mapping
first - don't spend too much time doing part throttle at first.
- OverRev Shift Value
- On the 05 600 6rr, it's probably max value of 300 rpm - add more
and a interesting box pops up and lowers whatever you typed in to
something under the limit.
- Fuel Cut
- Use fuel Cut at closed throttle, Use: "0" - No fuel under
shut throttle - Slightly better mileage, twitchier from closed
throttle to slightly + throttle
- Not Use fuel cut, use: "1"
- FI still delivers a bit of
fuel at closed throttle, makes for smoother on/off/ throttle
operation.
- Exhaust Valve
- Use: "0" - If you have some sort of variable Kawasaki
"exhaust pipe valve" or (and I haven't tried this) only a slipon
exhaust might still have one or some zooty "you probably don't have
one" KRT exhaust.
Remember, you'll have to map the Exhaust Valve opening across the
rpm and throttle positions!
- Not use: "1"
- which is what 99.9% of us have......
|
| |
Sending data (reflashing) (your tuning file, table, map) to the ECU
- Engine off, key on and Run switch on
- Main Menu > SET
- Select: Data Exchange
- Select Read
- It will ask you to read from
- ECU data
- Read direct from ECU to probably see what's there and
probably save it to a file on your computer.
- Edit Data
- What you've been adjusting (rpm and throttle breakpoints,
fuel and ignition and whatever values on your computer
- File Data
- It will prompt you to find a file on your computer that you
want to download to the ECU.
- In this example, we want to send your set of modified tables to the
bike's ECU - so, it's either Read the computer's saved "Mystandard_data.est"
File Data and download it to the ECU or you could just send the current
Edit Data that's on your computer screen (but make sure you save it!)
- After you hit READ at the bottom left of the box, you'll get a
confirmation, like "Read from edit data (or file or ECU data) ---> Complete"
- To Write or send your data to the ECU, simply hit Write.
(Engine off, key on and Run switch on)
- It will take about a minute to download.
- When 100% finished (it will say so), turn the ignition off for
5-10 seconds, then turn it back on.
- I'm not absolutely sure that it's necessary to cycle the Denso
ECU, but, whenever reflashing an ECU, it's wise to second guess the
manual.
- You've got 3 other choices across the Write box
- Verify (to cross check you data against the ECU data)
- Clear (to re-choose data to send)
- Close (to close this box and get on with tuning)
- Now you can do your base dyno test with you new rpm and / or THrottle %
steps
|
| |
Tuning - Setup and run KRT "Monitor"
- Main Menu > Monitor
- Click Main Menu > Item Select
- Clear all but Engine Speed and Throttle Position with the
<<(U) dealio.
- each item displayed takes about 1/4 second to refresh and the more
items selected, the slower the rpm and TH % reads out.
- Main Menu > Monitor
- hint: shortcut from screen with cntl-M
- On the Monitor window, click
Start
- Now you've got RPM and THrottle % readout on the same
screen as whatever table you select to tune.
|
| |
Ok, so we've set the com port to set up computer to ECU
communication - Set up the RPM and TH % breakpoints like
we want them -
Sent our Constants List like we want them -
Set up the Monitor function so that we can read RPM and TH % -
Sent the complete set of tables to the ECU -
Ok - maybe it's time to actually tune.
The tuning
will be focused on using an EC997 dyno, as it's extremely easy to
tune to Best Power. Probably easier to learn to tune to Best Power
than to learn to work the Kaw, HRC and Suzuki Denso kit box
software.........
And now, how to win friends and influence people.....
It's almost impossible, in less than most of a day, to tune to
Best Power on a dealership level dyno as many race teams have in the
USA. That's why you see kit ecu's with power commanders piggy-backed
and Ignition modules piggy-backed to the piggy-backed fuel modules
with piggybacked quick shift modules piggybacked on the other 2
piggybacked modules for fuel and ignition changes. The only reason for that is that they
don't have the dyno capability to tune to Best Power. (one race team
member, when discussing their dynojet dyno's tuning capabilities....("We
don't just have a regular dynojet dyno." "What do you mean?" "Ours
is built into the floor......" "Oh...I see.....")
They religiously "tune to an af ratio" on a dynojet dyno at
racetracks and think that's the best it can be. (I guess that's why
they do it....). It takes 1 to 5 hours to tune the entire rpm / TH
band, fuel and ignition to Best Power using an EC997 dyne system
to close to 100% potential - Meaning it's tuned to Best Power
AND well enough to
be a streetbike, with smooth lowend cruise, etc... Takes about 1/2
hour - 45 minutes of running to start from scratch and do a
"racetrack" quality job. A "Racetrack" job is making the bike idle
and take throttle, then tuning any horrible spots, then tuning the
all the throttle positions and rpms to Best Power that the rider will use on the
track.
A "Street" job takes longer - as you have all the "cruise" throttle
positions and rpms to do too.
It takes a dealership level dynojet dyno an hour or 2 to completely tune to "an af
ratio" at all rpms to 90% potential. (and they are not even close on
the ignition 90% of the time) and probably still not at a silky
smooth streetbike cruise level.
There's 3 big (successful) teams that knows that "tuning to
an af ratio" is not a goal....... |
| |
The TRICK to tuning the KRT ECU
- When making fuel, ignition or other table changes (I
don't know if it works on the "Constants List")
- You can make a value change in a cell - and while
that cell is still highlighted, hit
"Shift + Enter". and that
single cell's or selected range of cells value/values will be sent to
RAM and the change is instantly testable.
- But REMEMBER! ALL table changes that are on your computer
that you sent to "RAM" disappear if you turn off the bike - and to get them
back in RAM, you'd have to go to every table, select every cell and re
"Shift Enter" again (takes a long time and is potentially confusing.
- If you want to make those changes permanent (and you
may as well), you have to use "Data Exchange" and "Write" edit or file
data to the ECU.
- I usually do a bit of work, save the computer "Edit
Data" to a unique filename and then "Data Exchange, Write, to ECU".
- Suggestion for saving - so you can keep track -
- Example: Create a new subdirectory in the
WORK directory, like
"zx6rr,05,Akra_sys,FPstacks,BMCracefilter,Frech,Eric"
- Save working edit data with date, time and short
note as "2009,03,18,0528pm,work_on_fuel_table.est"
- Then "Data Exchange" to the ECU - Then, the bike
has all the edits permanently in the ECU and they will still be
there when you turn the bike back on.
- Remember, if you are tuning and get totally
confused and flustered, you can always "re-Data Exchange" the
"all zero" "standard_data.est" to the ECU.
- Generally, if I'm tuning and accidentally turn off
the bike, I'll just save the current file on my computer and "Data
Exchange" the whole kit and caboodle to the ECU - easier and it will
send all the tables in about a minute.
|
| |
Common errors
- Accidentally forgetting to link the 2 fuel tables when
tuning (and you spend hours tuning and wondering why the hp isn't changing
very much when you are just changing 2 cylinders our of 4......)
- Accidentally turning off the engine when you are tuning
in "RAM mode" and forgetting that "RAM" changes disappear on engine restart
/ ECU reboot.
- Using rpm breakpoints that aren't optimal and having to
restart all your tuning all over after you fix them.
- Finishing tuning to perfect, but forgetting to "reflash"
the bike's ECU by performing a "Data Exchange" (file or edit
data to ECU)
|
| |
|
| |
Notes in tuning 05 zx6rr with Akrapovic system, Factory Pro
Superflare Velocity Stacks, BMC filter
- Link the fuel maps (Comp Map fro Injection)
- Select from Main Menu, "File", then "Menu", then
"Multi Map Edit" (or hit "F1")
- Select "Multi Map Edit" (it will only link the 2 fuel
maps)
- Adjust the fuel delivery to make best power at each
rpm break point in Steady State (NOT in an inertia Sweep Test)
- Select Ignition Table from Main
Menu
- You will have to delink the Fuel Tables (it's OK)
- Adjust ignition offsets for Best Power
- On the 03 to 06 zx6's, there's a lot of +4.92's
(+4.92 is the software limit) at part throttle.
- When you are done with both the fuel and ignition,
it's probable that you'll have a transient "burble" when applying
throttle from low rpm -
- Select "Compensation for Acceleration"
- "Compensation fro Acceleration" is the ECU's
"accelerator pump" function.
- Decrease values at lower rpm, until the burble
goes away when snapping the throttle on a fully warmed up engine.
- -10 to -20 is possible from 2000 to 5000 rpm.
- The only way to optimize "Acc Pump" values at
higher rpms is to try it on the track and see what "feels better" to
the rider. Some riders like more and some rider's styles like it
less - and nobody likes a burble when applying the throttle while is
2 wheel drift.
- When in doubt, leave the high rpm "Comp for
Acc" values at "0". and maybe try adjusting for the rider in
small "5" steps.
|
| |
To be continued March 19, 2009
Marc |
| |
|
| |